
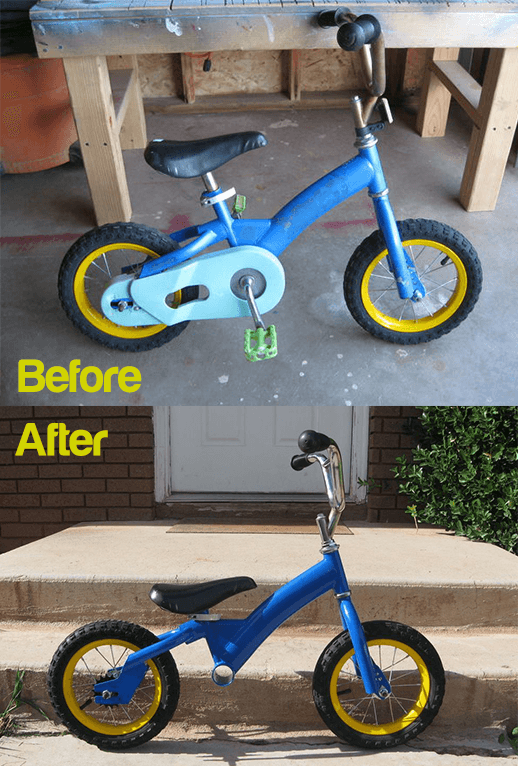
Balance bike is a necessary of kids these days. But what if you already have a child bike wasting in your house? Why not try to convert it into a balance bike for your child. Conversion process might take only a few minutes of your time and there might be no cost to it.
Make a kid’s bike into a balance bike
First of all, you need to be sure that the bike you are going to convert is the perfect or nearly perfect measure of your kid. If you are still having problems finding out whether the cycle is your kids measure go to your nearest bike shop and look for the balance bike. That way you will get a pretty clear idea of the size.
The tools needed:
- Liquid Wrench lubricant
- Duct Tape
- 13 mm Wrench
- 15 mm Wrench
- Chain Removal Tool(optional)
- Large Crescent Wrench
- A Regular Head Screwdriver
- #2 Philips Head Screwdriver
Steps to be followed:
Step 1: Remove the bolts of the chain guard using #2 Philips Head Screwdriver and take the chain guard off.
Step 2: First we have to take off the paddles. Take your 15 mm Wrench and turn it clockwise to take off the paddles.
Step 3: Go to the non-chain side of the bike and loosen the bolt using your Crescent Wrench. After taking off the bolt, you will see there is a washer inside the bolt. Take the washer out.
Step 4: Below the washer there is a spanner bolt, which has two slots where you can fit your Regular Head Screwdriver. Continue to turn clockwise direction to loosen up the bolt. When it is loosen up you can take it off with your hand.
Step 5: After taking out the spanner bolt you will find a bearing. Take off the bearing either using your hands or your Screwdriver.
Step 6: Now the trickiest part, pulling out the crank. There is no shortcut to pulling it out, so you have to pull it out the old way, with your hand. It takes quite a long time to pull it out. But eventually it comes out.
Step 7: Now we are going to remove the chain or break the chain using a chain removal. Position the chain in the notches of the chain removal perfectly. When you will see the notches of the chain removal aligned with the chain you will understand the chain is positioned perfectly. Now start turning extractor bolt. When the pin of the chain is about to come out of the other end stop turning and pull out the removal tool. Now pull the chain and it will come out easily.
Step 8: Usually the seat of a balance bike is lowered to the lowest height. You can use your 13 mm Wrench to take off the seat bolt and lower to your kid’s height.
Some Advice: You should always put all the bolts and bearing and chain in a same place and it would be better if you can put back all the things in the crank so that next time when you want to add the paddles and chain you will know how to put it back. Also, you should take plenty of pictures to memorize the process.
Once in a while use lubricants on the chain to keep it smooth and dirt less. Also use Teflon Grease on the nuts and bolts and bearings and even on the seat bar to keep them rust less for years.
Conclusion: This simple process will not only save your money, but you will also feel like you have done something great for your children.
Leave a Reply